How to Create Beveled Letters

Learning new techniques not only expands our skills but also allows us to create better and more attractive work.
One lettering effect every lettering artist should learn are bevel letters.
What is a bevel?

A bevel is a slanted surface or edge.
This is primarily used in carpentry but it makes a very great lettering effect too.
In this tutorial, I will be guiding you through creating a beveled effect on your lettering.
Here’s what you’ll need:
- Pencil
- Ruler
- Paper
- Colored Markers
- Letter Ruler (Optional)
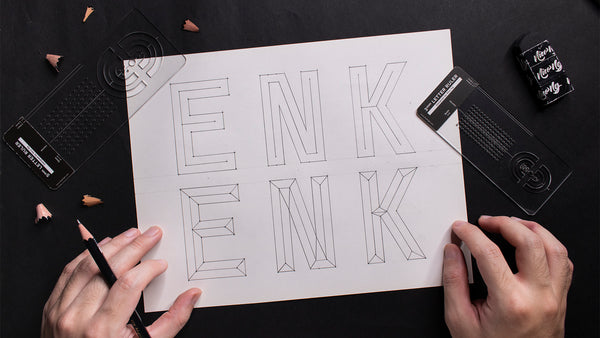
Creating the Base Letters

The first step is creating our base letters.
If this is your first time creating bevel letters, I suggest you start with a simple sans serif block letter as the base.
This will help you understand and apply the concept easier. But I encourage you to try this effect in other lettering styles later.
You can use the Letter Ruler to create the block letter and the bevel guides easily. The Letter Ruler is a great tool to help you create smooth and consistent letters with its grid system.
Check out this video to learn more about the Letter Rulers.
Drawing the Inline
After drawing your base letter, it’s time to draw the inline element. These are lines in the middle of the letters to indicate the beveled edge.

The inlines should not touch the edges of the base letter. Leave some space between the end of your inline and the edge of the letter.
Note: For letters with diagonal elements (e.g. A, M, V), observe the joints of your inlines. Most joints should not be pointed but flat.
Creating the Bevel Effect
Letters are composed of straight elements, curved elements, or both. The steps to creating bevel effects are different for each type. We will discuss each type separately.
Straight Elements
Letters composed of only straight elements are easier to create a beveled effect. These letters include A, T, H, E, F, I, K, L, M, N, V, W, X, Y, Z.
Straight elements include vertical, horizontal, and diagonal parts.
Simply connect all of the ends and corners of the inlines to the nearby corners of the letter.
For letters with intersecting inlines, connect the points of intersection with the nearby corners of the letter.
Normally, the angle of our bevel lines should be drawn at a 45-degree angle.
Curved Elements
Sketching the bevel for curved letters can be tricky at first. These letters include B, C, D, G, J, O, P, Q, R, S, and U.
First, locate the center point of each curve. You can imagine extending the curves to form a circle or oval.
Next, draw a line at a 45-degree starting from the center point moving towards the curve.

Creating bevel letters for the first time can be confusing, so I’ve made an alphabet guide for you to use as a reference. This guide shows you how to draw the bevel effect for each letter.

Coloring the Beveled Letters
After creating the technical side of bevel letters, it’s time to put your creative hat back on and color your lettering.
There are several ways to color your bevel letters. Whether it’s one, two, three, or four colors, you have to understand how light works on beveled surfaces to be able to color the sections correctly.
Placing a light source at one corner gives your letters four shades of color: light, base, medium, and dark.

All beveled sections facing up will have the light color, sections facing right will have the base color, sections facing left will have the medium color, and sections facing down will have the dark color.
The color placement should be consistent throughout the lettering piece to keep the letters united and uniform.
Bevel letters can also be created with fewer colors. Having four colors is not required. You can even use patterns instead of colors.
One-Color Bevel

To create a one-color bevel, ink the outlines of your letter and fill both the bottom and right faces in the same color.
Two-Color Bevel

To create a two-color bevel, fill both the top and left faces with your first color, and fill the bottom and right faces with your second color.
Three-Color Bevel

To create a three-color bevel, pick two faces that will share the same color. Then color the remaining two faces with the other two colors.
Pattern-designed Bevel
You can choose how many patterns you want to use then follow the same instructions but instead of filling the faces with solid colors, fill them with your pattern designs.
Experiment on these and create even more stunning beveled letters.
Shadows
Take your beveled letters a step further by adding depth and dimension. A simple 3D effect can do so much to your beveled letters.

Check out my previous tutorial to learn 5 Ways to Add Dimension to Your Lettering.
Try this with other lettering styles!
This tutorial focuses on the bevel effect on block letters. But you can apply this effect to other lettering styles too.
Try it with the following lettering styles too!

Final words
Practice creating bevel letters the right way with this printable worksheet. This worksheet will guide you one step at a time.
And the next time you create a lettering piece, try adding a bevel effect and see how much better it’s going to look!
Don’t forget to tag me @nicong.co when you try this effect so I can check your work and give you feedback.
Let me know in the comments what a good color combination is for bevel letters or if you have any questions.

3 comments
Love your work and the fact that you are willing to share your methods. Thanks so much!!
Thanks for this tutorial Nico. It sure does help me in improving on bevel style lettering. :)
Thanks for this, Nico! Can’t wait to try making beveled letters! As always, you’re awesome ✌