Tile Pattern Tutorial Part 1: Creating Realistic Tile Pattern
Tile artworks like this are composed of several layers of effects clipping masked to the base layer to achieve this realistic effect.

Let’s go through the NN Tile Pack brush set and the different types of brushes included in the set.
-
Solid Tile Brush

Solid tile brushes (like the Arc Tile) are what we’ll use to make the base layer. We will brush the entire base layer with your desired tile pattern.
-
Grid Brush

“Grid” brushes are for coloring the grout or the gaps between the tiles, which is an optional part of the process.
-
Highlight Brush

The “Highlight” brushes are for adding light reflections on the tiles. We will use the color white for this brush.
-
Shadow Brush

The “Shadows” brushes are for creating a shadow effect on the tiles. We will use the color black for this brush.
Note: When using the Highlight and Shadow brushes, do not lift your apple pencil until you have completely shaded the entire canvas, otherwise you will have visible overlapping highlights or shadows.
-
Random Shade Brush

The “Random Shade” brushes are for creating a non-uniform or abstract tile coloring effect without having to recolor one tile at a time.
-
Pattern Coloring Brush

The remaining brushes are for coloring the tile patterns. Instead of having to color drop one tile at a time, these brushes turn the tedious process into a quick and easy one!
Step-by-Step Guide:
STEP 1
Fill the entire layer with your desired tile pattern using the solid tile brush.

Tip: Zoom out the canvas to make it easier to fill up the entire canvas. You won’t need to make very long brush strokes this way. But make sure the canvas isn’t rotated otherwise the brushes won’t fit well together.
STEP 2
Create 2 new layers with Clipping Mask on - one for your highlight and one for your shadow.
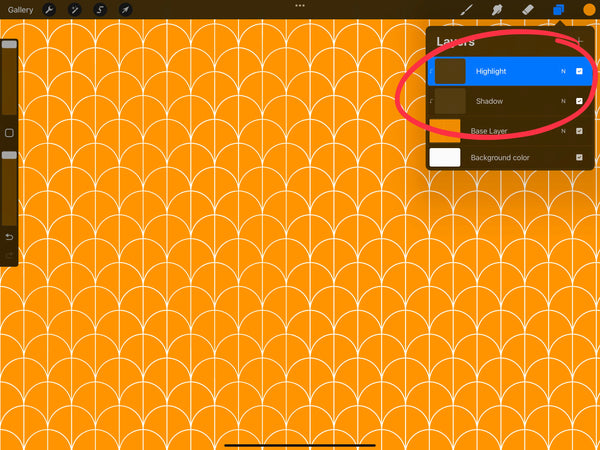
STEP 3
Select the color white, the highlight brush, and cover the entire layer with white highlights.

STEP 4
Select the color black, shadow brush, and cover the entire layer with black shadows.

STEP 5
Create a new layer below the shadow layer to add an abstract coloring effect. Using the Random Shade Brush in black, brush the entire canvas. Adjust the blending mode to Overlay and lower the Opacity to lighten the effect.

STEP 6
Add four new layers above the Base Layer with Clipping Mask on.
STEP 7
Pick your first color, first coloring brush, and brush the whole first coloring layer.

STEP 8
Repeat the process for the second color.

STEP 9
Repeat the process for the third color.

STEP 10
Repeat the process for the fourth color.

STEP 11
Add a new layer below the shadow layer and cover the entire layer using a tile texture brush. You can adjust the blending mode and opacity to your desired outcome.

And we’re done! It’s so easy to create stunning tile art right? I would love to see your tile art, so tag me @nicong.co when you share it.
Let me know in the comments if you have any questions. Click here if you want to purchase the Tile Pattern Procreate Brushes & Textures.
Watch the real-time brush demonstration here:
The next tutorial will be on Decorating Beautiful Square Tiles (Part 2).